


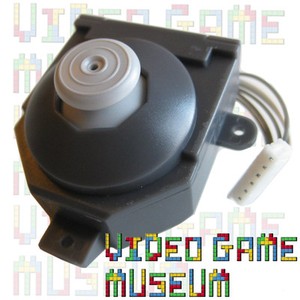
While I've yet to attempt to achieve this particular solution myself, it seems trustworthy enough that I may eventually consider trying it (thankfully, the controllers I purchased for my recently obtained Nintendo 64 have fully functional and quite satisfactory components all around, excluding the "A" button on my green controller of course): while browsing Amazon for nifty accessories, I came across a product (more than likely third party) entitled "Redesigned REPLACEMENT Joystick for Nintendo 64 Controller Repair N64 Thumbstick Pad". Evidently, someone realized that the thin support-stick design wasn't the most efficient way to ensure that the component in question would survive reasonably for as long as possible, and that someone in question decided to develop an alternative control option in a form quite indicative of the GameCube's sturdy directional-stick design (a wise decision, I would say). I've heard some internet rumors (as we all know, those tend to be quite reliable) that suggest the sensitivity and responsiveness of the control-stick suffer a bit in more demanding games like Golden Eye 007, but as I stated, I've never tried to use this product, so I may neither confirm or deny anything with absolute certainty. I'll probably try to hunt down one of the more exotic colored controllers (just today I saw one that was ) whose control stick has been abused beyond any possibility of productive service, and repair it (assuming this product is functional as advertised) with this product. The GameCube controller is probably my favorite first-party controller, so the idea of implementing it in what was previously one of my least favorite first-party controllers, is quite attractive indeed.
Anyway, back to what I was originally hoping to focus on, that obnoxious "A" button (or whatever may be the obstructive entity, in your case). I purchased today a solid green controller in satisfactory condition, more specifically meaning that it was relatively clean externally, and the the control stick was absolutely superb. I was so infatuated with this latter quality that I foolishly neglected to investigate the condition of every other button on the controller, and as my luck would have it, the "A" button was partially dysfunctional in that it was stuck in a "half-pushed down" position, and it did not seem to respond when I pushed down on it. I use the term "partially" dysfunctional because, regardless of the button's condition, the console still responded to my input on the controller. Regardless, I was still unsatisfied by the inconvenience that the "A" button proposed, so, by StevieJay's recommendation, I decided to investigate the procedures I would have to follw in order to repair the controller as quickly, efficiently, and cheaply as possible. On YouTube, I came across a very helpful video (linked below), uploaded by user AdamKoralik (if you wish to see repair/ restoration videos and unboxings, as well as helpful advice concerning various pieces of gaming hardware, I would recommend that you subscribe to this channel as soon as possible).
In addition to linking to the video above, I'll post pictures of the procedure as I encountered it, and explain it step by step to the best of my ability (honestly, I'm not very experienced with repairing any sort of internal hardware for anything, and I found that this was not a very complicated process). I guess a numbered list would be the best approach to organizing such an explanation, but I really didn't do much more than what was explained in the video. Oh well:
1. I took my newly purchased, green N64 controller, and placed it on a paper towel, on top of an all-white surface so that any screws or miniature components would not blend in with my working surface (that would be fairly inconvenient, I would think)
2. I flipped the controller over so that the back side was facing upward, and removed the five backing screws; I then removed the two thinner screws from inside the chamber where memory cards can be stored. I strongly suggest that you make separate piles for each type of screw on the sides of your paper towels, as to ensure that you will not lose or mix up any of the variations (obviously each screw will only function properly if applied to the proper slot, but it would be a waste of time to mix them up none the less).
3. I then removed the back case of the controller, and proceeded to remove the three screws attaching the front casing to the directional-stick (there is a fourth black screw that may be removed if you wish to replace your directional stick). I then placed these three screws in a pile fairly close to the rest of the screws.
.jpg)
4. I removed the controller's chord from the prongs it was wrapped around, and then proceeded to remove all the electronic components by snapping out the mother board (as stated in the video, if the trigger buttons fall off of the controller as you are doing this, don't panic, you'll probably have wanted to remove them temporarily anyway for cleaning). Once I removed the electronic components, I set them down, in one piece, in the middle of my paper towel, and proceeded to focus on the remaining components
.jpg)
5. I removed the foam (or something of such a nature) tabs that hold the buttons in the controller, by removing the tabs from the prongs that they were attached to (each is attached by two prongs, I believe). I also removed the "Z" trigger button from the back of the controller, as I planned to wash it thoroughly as well.

6. I removed every button and analyzed their conditions. Sure enough, the "A" button was coated with some quite unattractive, black, sticky substance. I found that the same repulsive substance coated the inside of the cavity of front plate where the "A" button ordinarily fits. Having removed all electronic components, I decided to rinse off every piece of plastic (as well as the foam tabs) that composed the controller thoroughly with soap and water, taking care to focus most actively on the areas coated with the sticky black substance. Once I finished washing each piece of the controller, I dried it to the best of my ability with additional paper towels and ear cleaners (some of the buttons are very difficult to probe, given their internal structure). I then left every component to air-dry for approximately three or four hours.
Caution: Take very special care to establish that every plastic component is completely dry before proceeding, as you are at risk of damaging the controller's electronic components otherwise.
.jpg)
7. I then placed each button back in their respective slots on the front casing of the controller, and replaced the foam tabs where they belonged. I snapped the "Z" trigger button back into place on the back casing of the controller, and proceeded to place the mother board (I'm not very experienced with the internals of electronic hardware, but I'm pretty sure that's what it's called) back into the front casing. I found it most convenient to start by winding the tip of the chord back around the prongs it was initially wrapped around, and then the rest of the board fell into place fairly smoothly. I then placed the "R" and "L" triggers back into position by placing their prongs in the proper slots. With everything pertaining to the inside case in place, I re-positioned the directional stick and its case, and replaced the three respective screws in their proper positions so that the directional stick was once again firmly attached to the front casing.
8. I then replaced the back casing in its proper position and made certain that it was properly aligned with each screw slot (not too difficult). I screwed each of the five larger screws back into their proper positions as to reattach the back casing to the front casing (these screws may be placed in any of the five slots that their sisters were removed from, however, they will not fit in the holes located in the memory card slot of the controller). Some time during this process, a loud snapping noise and a forceful impulse under my left hand nearly gave me a miniature-heart attack, but I quickly discovered that this noise was simply a confirmation that the back casing was firmly restored to its proper position.
.jpg)
9. I then placed the two smaller screws in their respective slots inside the memory card compartment, with a magnetized screw driver (more likely than not, this is an amateurish way to describe such a tool, but I feel that it possess enough descriptive detail to be articulated by all targeted audiences), as recommended in the video above. With every screw firmly in place, I recognized that the controller was once again in one piece, restored to its former glory, with the addition of fact that the "A" button now functioned properly. I really don't want to know what sort of grotesque substance was preventing this button from functioning properly, but a little soap and water seemed to solve the problem almost perfectly, so I can't really complain anyhow.
Hopefully anyone who has encountered the "sticky button" problem will be able to solve it using the same procedure that I followed. However, if this process was not able to solve your problem, if you have any questions or concerns, or if you have any other relevant solutions or problems that you would like to address, please to feel free to leave a comment in the comments section below. I wish the best to all of you and hope that you will be able to overcome and destroy the obstacles of worn controllers without feeling obliged to purchase a new one. Thank you for your time, and have a nice day! Or night. Or life. Or both!
1. I took my newly purchased, green N64 controller, and placed it on a paper towel, on top of an all-white surface so that any screws or miniature components would not blend in with my working surface (that would be fairly inconvenient, I would think)
2. I flipped the controller over so that the back side was facing upward, and removed the five backing screws; I then removed the two thinner screws from inside the chamber where memory cards can be stored. I strongly suggest that you make separate piles for each type of screw on the sides of your paper towels, as to ensure that you will not lose or mix up any of the variations (obviously each screw will only function properly if applied to the proper slot, but it would be a waste of time to mix them up none the less).
3. I then removed the back case of the controller, and proceeded to remove the three screws attaching the front casing to the directional-stick (there is a fourth black screw that may be removed if you wish to replace your directional stick). I then placed these three screws in a pile fairly close to the rest of the screws.
.jpg)
4. I removed the controller's chord from the prongs it was wrapped around, and then proceeded to remove all the electronic components by snapping out the mother board (as stated in the video, if the trigger buttons fall off of the controller as you are doing this, don't panic, you'll probably have wanted to remove them temporarily anyway for cleaning). Once I removed the electronic components, I set them down, in one piece, in the middle of my paper towel, and proceeded to focus on the remaining components
5. I removed the foam (or something of such a nature) tabs that hold the buttons in the controller, by removing the tabs from the prongs that they were attached to (each is attached by two prongs, I believe). I also removed the "Z" trigger button from the back of the controller, as I planned to wash it thoroughly as well.

6. I removed every button and analyzed their conditions. Sure enough, the "A" button was coated with some quite unattractive, black, sticky substance. I found that the same repulsive substance coated the inside of the cavity of front plate where the "A" button ordinarily fits. Having removed all electronic components, I decided to rinse off every piece of plastic (as well as the foam tabs) that composed the controller thoroughly with soap and water, taking care to focus most actively on the areas coated with the sticky black substance. Once I finished washing each piece of the controller, I dried it to the best of my ability with additional paper towels and ear cleaners (some of the buttons are very difficult to probe, given their internal structure). I then left every component to air-dry for approximately three or four hours.
Caution: Take very special care to establish that every plastic component is completely dry before proceeding, as you are at risk of damaging the controller's electronic components otherwise.
.jpg)
7. I then placed each button back in their respective slots on the front casing of the controller, and replaced the foam tabs where they belonged. I snapped the "Z" trigger button back into place on the back casing of the controller, and proceeded to place the mother board (I'm not very experienced with the internals of electronic hardware, but I'm pretty sure that's what it's called) back into the front casing. I found it most convenient to start by winding the tip of the chord back around the prongs it was initially wrapped around, and then the rest of the board fell into place fairly smoothly. I then placed the "R" and "L" triggers back into position by placing their prongs in the proper slots. With everything pertaining to the inside case in place, I re-positioned the directional stick and its case, and replaced the three respective screws in their proper positions so that the directional stick was once again firmly attached to the front casing.
8. I then replaced the back casing in its proper position and made certain that it was properly aligned with each screw slot (not too difficult). I screwed each of the five larger screws back into their proper positions as to reattach the back casing to the front casing (these screws may be placed in any of the five slots that their sisters were removed from, however, they will not fit in the holes located in the memory card slot of the controller). Some time during this process, a loud snapping noise and a forceful impulse under my left hand nearly gave me a miniature-heart attack, but I quickly discovered that this noise was simply a confirmation that the back casing was firmly restored to its proper position.
.jpg)
9. I then placed the two smaller screws in their respective slots inside the memory card compartment, with a magnetized screw driver (more likely than not, this is an amateurish way to describe such a tool, but I feel that it possess enough descriptive detail to be articulated by all targeted audiences), as recommended in the video above. With every screw firmly in place, I recognized that the controller was once again in one piece, restored to its former glory, with the addition of fact that the "A" button now functioned properly. I really don't want to know what sort of grotesque substance was preventing this button from functioning properly, but a little soap and water seemed to solve the problem almost perfectly, so I can't really complain anyhow.
Hopefully anyone who has encountered the "sticky button" problem will be able to solve it using the same procedure that I followed. However, if this process was not able to solve your problem, if you have any questions or concerns, or if you have any other relevant solutions or problems that you would like to address, please to feel free to leave a comment in the comments section below. I wish the best to all of you and hope that you will be able to overcome and destroy the obstacles of worn controllers without feeling obliged to purchase a new one. Thank you for your time, and have a nice day! Or night. Or life. Or both!
Julio
ReplyDeleteenjoyed staying on this page and request you to keep publishing post like - Scroll to the top or bottom with sticky button
ReplyDelete